Showing posts with label flash. Show all posts

Feb 22, 2013

Valentine's Day photobooth Setup

It really is true that after an event, wedding or otherwise, the only thing you really keep are the memories.  And the memories you keep best are the ones you have pictures of.  If it is done right, a fun photo booth can make an event memorable and add to the enjoyment of attendees.
Adamson-6013

While this photo booth setup is fairly simple, you do need a lot of lights for the look.  I used four strobes, all in various forms of softboxes with a Thunder Grey Seamless background.

Space was a bit limited, with an 8' ceiling and only about 12' wide area.  With that, I was still creating a bottleneck for traffic through an entrance.
Luce

At the back, I used Elinchrom 500ws Strobes in 2x2' softboxes at minimum power to create the rim and hair light that separates the subjects from the background paper.  Adjusting the angle of the softboxes also changed how much light was hitting the backdrop, giving it a nice gradient without a separate light.

In front, an Alien Bees ABR800 with the 56" "Moon Unit" octabox was the key light high and camera left. It was at 1/2 power.  On the right, as a strong fill light is an Alien Bees Einstein strobe in a3'x4' softbox.

Simple setup, but it is a lot of softboxes in a small space.
Photo booth setup

When shooting more than two people in the booth, getting a strobe in the shot was inevitable...
FBPage-6515

But with one or two, I like the results.
FBPage-6529

Remember, it isn't about perfection for each image.  There isn't time to customize the lighting for each subject.  Instead, a good general setup that will give good results and keep people moving through is the objective.

A couple of notes... Props make a photo booth more fun.  Giving people something to interact and be creative with helps them be more comfortable than just standing in front of a camera.  And if you make the props, make them matte finish or watch the reflections.

Another  consideration is how you trigger the flashes.  Most monolights have built-in slave triggers so that you would only need a radio trigger on one of them (or even us an on-camera flash as a trigger).  However, at some photo booths, people will use their own cameras to get a shot at the same time.  I have found it beneficial to go ahead and put radio triggers on all of the flashes to avoid having someone with a point-and-shoot popping the flashes.

I took the photos here, but another option is to set up a photo area and allow guests to take their own photos...


Be forewarned.  If there is a photobooth, someone will want to do a jumping photo :)
FBPage-6540


Jul 17, 2009

Quick Pics - Drum Corps in Dallas

I only marched for one year in high school band, but it was plenty to give me some real appreciation for the work and talent that the DCI folks put into making some truly remarkable shows.  I've always been a drummer at heart (ask my mom what happened to the pots and pans), but this was the first time I have seen one of these events in person, and it was very fun and entertaining.

The July heat made it even more impressive.  I was a massive pool of sweat just taking pictures.

I arrived early, and the ambient light was still very bright, although some clouds were starting to soften it a little from direct sunlight.
DCI Blog-107

Using a flash in the daylight can put a little fill into faces, and if you want, you can intentionally underexpose the ambient light.  If it is done well, it just draws attention to your subject without being obvious flash.  Of course, it also helps to take the flash off of the camera and hold it further away to avoid direct flash flatness.

I like this one, but the background is a little dark, and it is pretty obviously flashed.
DCI Blog-105

On this one I like the light balance, but I completely missed on the composition... 
DCI Blog-106

Still kind of obvious with the flash, but I like this one for some reason. That is some serious plumage.
DCI Blog-120

By the intermission, clouds had rolled in ahead of the much hyped weekend cool front. Made for some really cool blue sky backgrounds up in the bleachers. No flash on this either, just using the stadium lights and letting the background be dark and moody.
DCI Blog-108

My favorite performance of the night was by the Blue Devils. Besides being very well played, they used a large number of folding chairs. They marched around chairs, sat in chairs, stood on chairs, moved chairs around and all without anyone falling on their face.  From the bleachers, photo opportunities were pretty bland (the longest lens I had was a 70-200mm) but the chairs made an interesting visual element.
DCI Blog-109

OK, enough of that.  I know it isn't for everybody, but if you have an opportunity to see these kids (I can say that because I'm over 30, right?) perform, take it in and I think you will be impressed.

Happy Shooting

don j.

Jul 14, 2009

Backyard news...

OK, so this is a bit of a divergence from photo talk, but there are photos...

My lovely wife is an avid gardener, and she has turned our back yard into an oasis of flowers, veggies and general beauty.  A mockingbird family took up residence in a trumpet vine, with two baby birds until yesterday.  Now there is one baby, and he has abandoned the nest, maybe a bit early.  The mother bird is none too happy to have a goofy photographer snapping away... 

Seriously, total snapshots, but great scrapbook material (one of my wife's other hobbies).

Mom bird looks down at baby bird...  If I had been thinking, I should have put this together into one shot.  
BackyardBlog-100
BackyardBlog-106

Mom bird glares at photographer...
BackyardBlog-105

In other news, a huge Tomato Hornworm is making a mess of the tomato plants.  Seriously making a mess of them.  These things make bigger poop than mice, and they devour the plants down to the stems.  They also do not die easily.
BackyardBlog-107

It was getting dark, and I had the camera out so I decided to play with the flash in the evening light. By hand-holding the flash off of the camera, you can have the light coming from other directions. This looks much better than direct on-the-camera flash.
BackyardBlog-101
BackyardBlog-108
BackyardBlog-102


Sooo..  get out and shoot some, even if it is in your back yard.  Use the time to practice a technique or just document what's around you.  I'm not old yet, but I do know that having photos to remember places, people and experiences will be a great joy in the future.

Happy Shooting,

don j.

Mar 14, 2009

Location Portraits

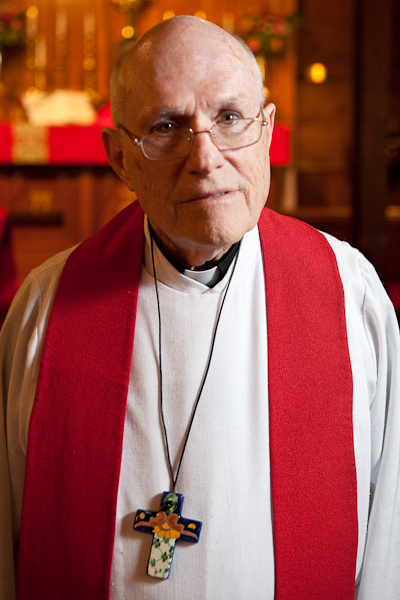
I have been attending church across the street from Our Merciful Saviour Episcopal Church for over 6 years, but I haven't made the time to visit. Built in 1909, the little green building is a wonderfully charming place, with lots of photographic potential. When local corporate/event photographer Jim Woods asked me to take some photos of an event there while he was out of town, I jumped at the chance.

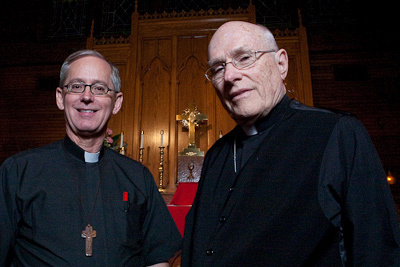
The event involved a farewell party Father Gene Baker, a much-loved interim priest at the church for some eight months, as well as welcoming in Father David Petrash who will fill the post full time.

Jim requested shots of each man in the church sanctuary, and with both of them together if time allowed. I could not have asked for a better setting or more gracious subjects...

The interior of the church is beautiful wood, with great stained-glass windows. With the sun dropping fast, I quickly set up a single flash with an umbrella and got some interior shots. First, Fr. Petrash... I liked how the cross could be framed in the window...

Canon 5D, 24-70mm, f4, 1/20, iso400

And a little tighter shot...

Canon 5D, 24-70mm, f4, 1/20, iso400

Fr. Baker wasn't quite ready yet, so Fr. Petrash indulged me with some additional shots...

Canon 5D, 24-70mm, f3.5, 1/25, iso400


Canon 5D, 24-70mm, f4, 1/20, iso400

I used the same setup for the two men together...

Canon 5D, 24-70mm, f3.5, 1/15, iso400

Then Fr. Baker by himself. Just to be different, I placed him to the left and showed the entire altar to the right.

Canon 5D, 24-70mm, f3.5, 1/25, iso400

and closer...

Canon 5D, 24-70mm, f3.5, 1/25, iso400

Such a wonderful face.... gotta get even closer!
KaufmanEpiscopal-105
Canon 5D, 24-70mm, f3.5, 1/25, iso400

While time was short before a Shrove Tuesday service (and the following pancake meal), they gave me a few minutes for the shot I really wanted to try, outside in the fading light with the building as a backdrop.
KaufmanEpiscopal-104
Canon 5D, 24-70mm, f5, 1/50, iso640

Light was disappearing fast, and bumped the shutter speed a bit to make the background even darker. This made for a dramatic shot that really highlights the subject. (and of course, I have forgotten his name, my apologies!)

Canon 5D, 24-70mm, f5.6, 1/60, iso640

After the pancakes and a group shot, I managed to snag the two priests together in the sanctuary for one more shot with the altar.

Canon 5D, 24-70mm, f22, 1/15, iso3200

Happy Shooting,

Don J

Mar 9, 2009

Random Fun Shoot: Team Impact at FBCK

OK, two random fun shoot posts in a row... I will try to get back to some how-to's soon. Yes, I've been too busy having fun with the camera, which is not a bad thing!

Sooooo...
Three members of Team Impact, a group of very strong guys who excel at breaking things, visited my church for five nights of last week. For those of you who are not Christians, it may seem odd to have giants come to break things in church, but dont' worry, it is a bit odd to me also. Break things and tell people about Jesus? Yes indeed... If you want some deeper spiritual aspects of this sort of thing, head over this blog by one of the church leaders for some thoughts.

Naturally, when you combine modern-day giants, fire, and feats of strength, there are photos to be had. Of course, we don't want snapshots, do we?! I spent three nights trying to get some photos that I liked, and had a blast watching Chris, Marc and Greg do what they do.

Friday...
One thing I already knew... the church is not very bright inside. Of course, I wanted to set up lights. My first attempt was to put one strobe (Canon 430ex 1/4 power) on a column to audience right, about 5' back from the stage. (how does this work? Go to Strobist.com!) This was supplementing another strobe on the camera with a bounce card. Results... fair.
TeamImpactblog-100

As you can see, the background is really busy, and the flashes are lighting it up, a lot. I was pretty happy with the timing anyway.
TeamImpactblog-125

Using only ambient light, the Team Impact logo showed up as a nice background element, but there was no way to stop action that way.... here Marc talks to the crowd
TeamImpactblog-127

You can see there also how the ambient stage lighting causes dark shadow areas in the eyes... not attractive.

Using only the remote flash gave dramatic results, and I got my favorite shot of the evening when Marc was crushing diet 7-up cans...
TeamImpactblog-128

I knew I would have to work on that in the coming nights.

Finally on Friday, I saw that the single flash was making a nice silhouette on the opposite wall... so I waited for a gesture, thanks Greg
TeamImpactblog-129

I was completely unprepared for fire.. this is the best I could do, even with a lot of correction in the computer afterwards.
TeamImpactblog-126


Saturday
Friday night was a great learning experience to see how these guys operated, and to be prepared for the quick pace as they moved from one thing to the next...

I was ready for Saturday, putting a flash on each side of the stage, barely at the front edge firing directly across the room. Wherever the sprite would fly, I would be ready. It made for dramatic lighting...
TeamImpactblog-102

It was also awards night for the church's Upward Basketball League so the place was packed for two performances. It is always good to get a perspective that most people don't get to see. Of course, you risk embarrassing yourself in front of a crowd too. Unfortunately, the flash was catching the chandelier, so the attention goes to that instead of the bent-around steel bar.
TeamImpactblog-130

The kids really enjoyed the can crushing extravaganza..
TeamImpactblog-131

Sunday

Sunday night was the big finale, so what to do photographically speaking?

First up I wanted to try a lot of things so I started with a 14mm Sigma on the Canon 5D. Very Wide, unique angle, no flashes, and very dark.

TeamImpactblog-132

Unfortunately, with the flashes on, the wide angle almost always had a flash in the field of view causing lots of flare.

I went with two remote flashes again, on each side of the stage but further back. I also set them on different channels of the remote (Elinchrom Skyports) so that I could fire them individually or both at the same time.

Together, they lit the stage nicely, although I should have worked on getting less light on the background
TeamImpactblog-104

Even getting in close the background is busy, but the fire makes it OK, right? Shortly after this i was cleaning fire extinguisher residue off of the camera.
TeamImpactblog-105

The camera cleaning was a bit pointless, as bursting soda cans was coming soon.... and I wanted to get close.
TeamImpactblog-133

That was a little too close!

As the program wrapped up, it was time for the promised attempt at snapping an aluminum bat. As you might expect, this took a bit longer than breaking a standard wooden bat... and gave me time to play with using only one flash.

With both, the light was OK..
TeamImpactblog-134

With only one flash, the light was much more dramatic, and there was less light hitting the ceiling for a cleaner background. I was in the right spot to "frame" Chris' face with the bent bat as he made the final pull.
TeamImpactblog-135


While their approach may be unorthodox, these guys did a great job of both entertaining and sharing the message of Jesus.

Happy Shooting,

don j.

Feb 16, 2009

Photos for Ebay part 1: Small Items with a Point and Shoot

A few weeks ago, I had a conversation with Malissa over at Sleepyhollow Folk Art Originals about the importance of good photos for selling items on-line. Whether you are going to ebay, etsy, or any other online marketplace, the pictures are as close as a potential buyer can get to experiencing the item you want to sell. A bad photo can limit salability, cause a perception of poor quality, and reduce the number of people who are interested.

Luckily, getting better results is easy. You do NOT need a fancy new ultra-gigapixel camera to do it either. These photos are not for printing, so high resolution is not required. Everything in this post is shot with a 3 year old 5mp camera (Kodak v530)

You already know to get rid of distracting backgrounds and prioritize the subject, so priority one is to make a nice white (or black, or anything solid) background. A bed sheet, posterboard, etc. can all work, depending on the size of the object. Drape it over a chair and voila..
smallebay-101
smallebay-102


Well... better than sitting on the kitchen table, but the on-camera flash is glaring and maybe I should iron the sheet....

So, what if we want to do something a little better? Instead $170 or better for a light-tent setup, run down to your favorite craft store and pick up some white foamcore, then a couple of work lights (or any light holders will do) with some flood light bulbs. High wattage is best, just watch out because they will get hot.

Now make a shooting spot (here on the floor to use chairs for propping up the foamcore.
smallebay-106

Quick note about light... Pointing the lights directly at the object will get the most light, but also some harsh shadows, which are not helpful.
smallebay-108
smallebay-107

How to cut the shadows?
Point the lights into the foam core on the sides instead to make a larger light source. You lose brightness, but you will want to compensate anyway. Remember, your camera wants to turn all of that white into gray! That is why the photo above is so dark.

Here is the setup...
smallebay-105

and the result, less shadow...
smallebay-104

I have also corrected the exposure there by +1 in the camera.

When shooting shiny things especially, remember that the shiny bits reflect whatever color is hitting them. Surrounding the object with white (or black for darkened areas) will help.

Black backgrounds can be very effective, but as you see, you have to make sure it is clean!... Felt fabric works well for this. Foamcore shows dirt very well...
smallebay-109
smallebay-110

You will also want some detail shots. Here again, the on-camera flash does not help.. turn it off and let the side lighting do the work...

With the flash on...
smallebay-112

and off...
smallebay-111

All together, this setup is about $25 and you can stuff it all in a closet or under a bed etc. etc. If you can shoot by a nice big window on a sunny day, you can even do without a light...

don j