Jan 22, 2012

(Door) Framed

They say when one door closes, look for a window. I say when you don't have a window, find a nice open door.

Any nice indirect natural light source can be beautiful if it is in a nice scenic spot. I like to find nice open doors on bright sunny days to make location portrait light.

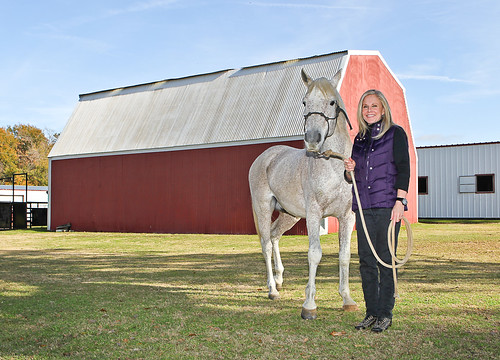
In this case, an outdoor portrait showing the red barn, blue sky, horse and owner was my first choice. Unfortunately with a horse, strong breeze and one person to help out, setting up an umbrella was not going to work out. On camera flash looks like bad photoshop. I like the scene, but not the photo.
Ripley Ranch-5780

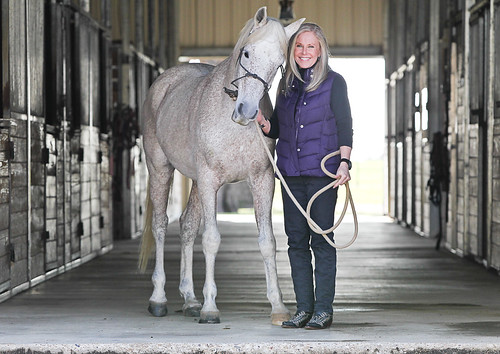
Before we headed out for that one, I had these two step to the edge of the barn door. We used one of these in the Tribune ... and it was in black and white, so the colors did not matter.
Ripley Ranch-5725

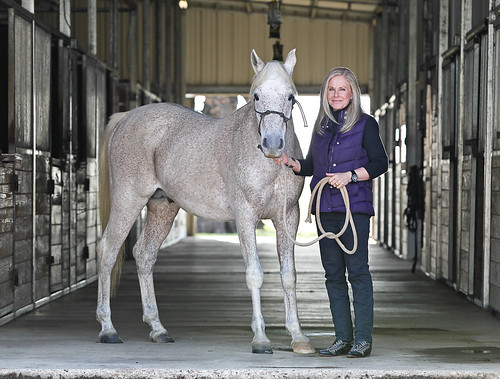
Horses can have such personality...
Ripley Ranch-5728

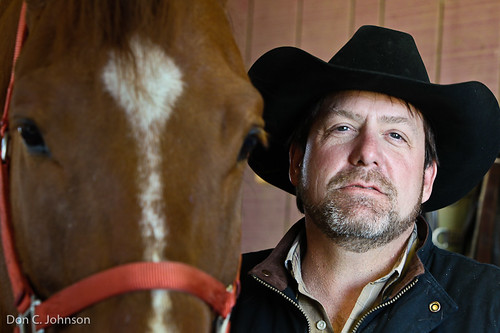
Another example from a year ago.. also a horse owner and a big barn door. Close to the door, the light fills in like a giant floor=to-ceiling softbox and is nice flattering light.
Thomas Bentley-6809

It can even get under a cowboy hat. And with his head turned to the side, horse blocking the fill from the left, the light is a little bit more dramatic here..
Thomas Bentley-6831

So frame somebody this week... with a door.

Jan 15, 2012

Couch Baby Photos (Part 2)

A quick trip to visit the in-laws was in order with the early arrival of a new baby. Of course, that meant photo time as well.

With almost zero time to pack, I left the strobes behind and went with a DIY lighting combination of two previous blog posts...

This little guy is quite a character already, but he was awake and not all that happy with the experience.
YO!

With the help of three family members holding up the sheet and light, it was a quick and painless experience to get some reasonably good photos of the baby... (Black sheet on couch, processed in lightroom)
Baby!

and the details...
Baby!

Baby!

Light was a clamp work light with 200w equivalent fluorescent bulb and a white sheet.

The good.. this was quick, easy (with lots of helpers) and decent photos considering the time used. Also good, no flash shock assaulting the baby. He still did not like the light as it was.

The bad.. still not all that bright. Hi ISO and low shutter speeds make for fewer keepers, shoot a lot. Without a lot of help, this setup would be tedious and painful.

Jan 8, 2012

Seeing Spotlights

On a theater stage, a spotlight lets you know where the action is without a doubt.

When taking pictures anywhere else, having a beam of bright light can make for a difficult situation. Too much bright, direct light wreaks havoc on the camera meter, and blows out parts of the scene...
3-124Cav-7891

But if you treat the situation the same way you would work with spotlight on the stage, you can wait for something happening in beam of light and make that picture.

In this case, soldiers from the Texas National Guard preparing to leave for deployment were lined up facing into the sun. Many of them squinted their way through the event.
3-124Cav-7884
Exposing for the brightly lit areas eliminates the background, pulling subjects out just like a spotlight on stage.

This building is the same place Terrell High seniors prepare for their graduation...
THSGraduation2011-82

Use manual mode or careful use of spot metering to get the correct exposure in the "Spotlights."

Another interesting effect to look for is softer light reflecting from the floor or walls.
3-124Cav-7805

Want to see this done well in sports photography? It's hard to beat Mark Rebilas for seeing the light and making great photos in it. Check out his best of 2011 football and baseball posts for what he gets by using the brightly lit areas well.

Jan 4, 2012

At a certain point ...

I've been working on some concept covers for our next Kaufman County Life magazine. After a while the photos start getting an attitude... crazy huh?
KCL Edit-7356-2

I suppose you can guess what the cover story is about.

Jan 1, 2012

Turn your Christmas lights into a softbox?

Making better photos involves a seeing, finding and using light for the look that you want. My goal for the blog in 2012 is to do something fun with light every week and talk about it here.

Don't store your Christmas lights away just yet... How about turning them into beautiful photo light instead?
Christmas Light Softbox-0800

When I first got back into photography in 2007, I saw a guy's use of a Christmas strand to make a Christmas Ring Light. That must have stuck with me because this year I had the idea to make a softbox style light out of the Christmas tree lights this year.

I started with a 2'x3' piece of foam board. With small slices into each end, I was able to put two strands of lights covering one side... these are the tiny lights.
Christmas Light Softbox-6683

Joshua was due for another chair photo so I used the DIY project for that. Set up in front of the chair, the Christmas light softbox added a some nice directional illumination to the existing room light.
Christmas Light Softbox-6678

Overall, the light helped, but wasn't all that bright. Shutter speeds were low, so a tripod helped get some reasonably good shots...
Christmas Light Softbox-0769

The real magic happened by moving the light closer and turning off the main room light so that there was more shadow definition.
Christmas Light Softbox-0820

Moving in close, you can see the Christmas light contraption in the eye highlights.
Christmas Light Softbox-0832

After the chair photos, Joshua played on the floor. I propped the DIY softbox on the floor in front of the couch and took photos. Because it is a constant light, there is much less "flash shock," so he just sat there and let me snap away. Good stuff.Christmas Light Softbox-6749

The verdict? It definitely works. This is easy, cheap, beautiful light.

The good?
This was a very easy, low-cost project. Wrap the lights and turn them on.
It isn't a flash, so for the baby, it was great.
Also, because it is constant, you can use this with any point-and-shoot or video camera. You may need to do some +/- exposure compensation to get that right.
I think this would also be good for objects, close-ups, food or anything else where you use a tripod.

The negatives?
It is not very bright. Shutter speeds will be low, ISOs will be high.
Positioning it is not simple. Standard spring clamps work, or you could hang it on a wall, but you will want a light stand or something similar to move it exactly where you want it.

To make it better...
I would like to try lights with brighter bulbs. Unfortunately I don't think the newer LED bulbs will be have the same light quality.
Covering the board with foil or reflective tape would probably add a lot of efficiency without degrading the light quality. Same with more strands of lights.
Multiple points of light, if they are close together, can be as good as one big light. Have fun, wrap something in light... and of course get some pictures. Happy New Year!

Don J.