Showing posts with label how-to. Show all posts

May 7, 2013

Putting light in a (very) dark corner

Blog-Corner Shot-5339
As is often the case, even proper planning can get thrown out the door on the morning of a shoot.  We had planned to use a nice open spot in a hotel breakfast area for quick portraits of ladies attending the first "Treasure the Moments Tea" put on by the Sharing the Love Foundation in Forney.  I had planned a simple clamshell type setup... beauty light that would work for all of the lovely ladies who would be coming through.

Upon arrival, however, I was told that that space would not be available and we were instead using a boardroom with a giant table that could not be moved, dark wallpaper and carpet, and about four feet of space to both light and provide access to the giant wicker chair we would be posing with.  Hmmmm....

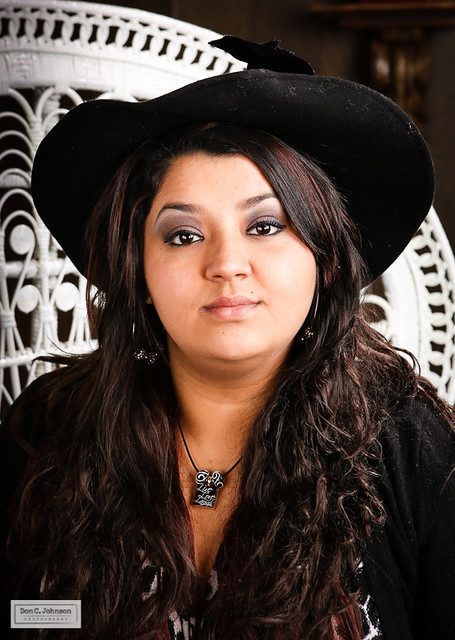
The only real goal was to give the ladies a decent photo to remember the occasion with.  There were also a lot of hats to be used as props, so the light would have to get under those...  just basic portrait stuff, but stuck in a dark corner.

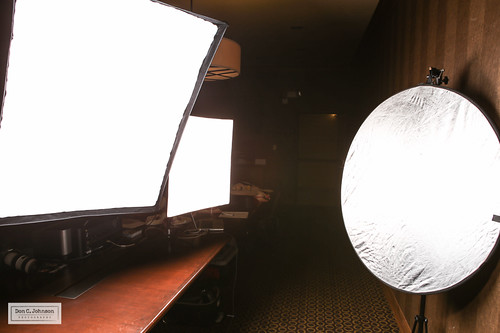
Here is what I worked out..  The space is tighter than it looks.
Blog-Corner Shot-5473

The key light is on the right...the big softbox closest to the chair.  The smaller softbox is actually aimed toward the reflector on the left.  It served as fill from the front and the left side, and under the chin.  I added another light (barely visible by the window) as a hair/separation light.

I initially tried to put the smaller softbox on the left side, but there was not enough room to walk past comfortably.  I wasn't sure if we would have anyone with mobility issues or possibly a wheelchair etc.

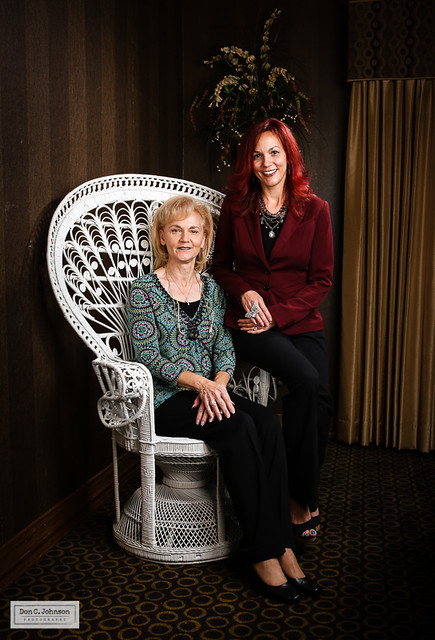
The view from the chair...
Blog-Corner Shot-5488

And, it worked reasonably well I thought...  The dark striped wallpaper was nice as a backdrop, even if the flower arrangement got distracting.  I probably should have removed them from the vase, but decided against it.  Did I mention I have a tendency to break things?

Blog-Corner Shot-5491

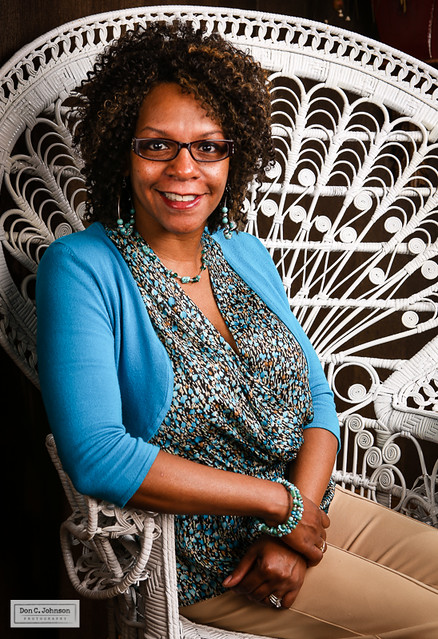
Tighter shots were generally better.
Blog-Corner Shot-5417

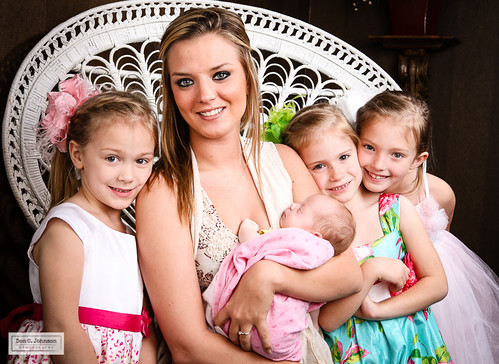
This was true with multiple people in the photo as well.  Not only was it a small space, the groovy chair's low seat and wide back and arms made posing around it a bit awkward.
Blog-Corner Shot-5483

Lessons learned... when you are stuck against a dark wall, you can bounce a softbox off of a reflector to make it work.  Also, don't be afraid of tight spaces.  It forces closeness in your subjects, which is generally good.

Thanks again to all of the lovely ladies for being great models and letting me be a part of the event!

Mar 4, 2013

Monday Photo Roundup - March 4

Walking Man-6988

The "Walking Man" sculptures in Deep Ellum are common photo subjects around here, but I like to stop by there when time permits.  Something about the whimsical nature of them that makes me smile.

Further east, there is a nice photo contest going on in the "Texas Forest Trail Region."

Strobist reviews the sub-$100 PocketWizard Plus X.  Looks good to me.

Great shots from young photojournalists...

Yes, post-processing makes a big difference in the look of your photos.  Even if you spent thousands on a camera.  The "Look" from most professional photographers comes from good work with the camera, and more work after the fact in the computer.  Simple tweaks to white balance, color saturation and contrast make a huge difference.

Speaking of which, photoshop guru Matt Kloskowski's Lightroom presets are a lot of fun to play with.  And free!

It looks like Canon has some nice new low-light technology in the works.  Looks like it is video-only at this point, but still... it is great to see even more progress in sensor sensitivity.

Have a great week.

Feb 18, 2013

Monday Photo Roundup - Feb. 18

FBPage-5936

Having great subjects makes a  photo booth setup a lot of fun.  Especially if they are willing to play a bit.  It helps to have fun props to interact with as well.

FBPage-5968

Here is a great project ... Photos from Civil War reenactments done with large format pinhole cameras.  Makes for amazing and intriguing images.

Seems simple but ... Five things to make sure you have covered before a portrait session...

What makes 'professional' lenses superior?  It's all in the details.

Bad photography habits to break...  Guilty.

Lots of lists today ... Things to learn while shooting with your phone.

Photo inspiration for the week ... 2013 World Press Photo contest winners.

Strobist goes back-to-the-basics on balancing flash in a photo.

InFocus blog goes back 50 years.

And, photo fun in the car ... go out when it rains and focus on the rain drops on your windows.
Feb 12-4824

Jan 22, 2013

Before and after - Post processing sports in Lightroom

Here is a quick look at a few images from high school basketball and how I adjust them for newspaper, as well as how far you can take them with a quick edit in Lightroom.

Terrell played hard but lost to Carrollton Newman Smith Tuesday night... It was not a great night shooting for me as much of the best action took place on the opposite end of the court, regardless of where I went.

However, when looking through the images, I was pleasantly pleased to find that the players were very expressive.  When players are really hustling, it shows on their faces.  That, in turn, makes much better pictures even when you don't get the best action shots.

OK... here is a quick 1-2-3.

Camera setup was Canon 1D mkIV, 50mm, ISO2000, 1/1250, f2.  That turns out slightly underexposed.
Lightroom Processing Sports orig-2572

Same picture, as sent it in to the newspaper...  Bumped up the exposure a bit, sharpened and with some noise reduction.  It makes a big difference for the newspaper press, which tends to print dark on most days.  If the images will run in black and white, I bump the exposure even more because anything dark gray prints black, and white is the color of the paper itself.
Lightroom Processing Sports-2572

I do more than 90% of my normal processing in Lightroom, and really 100% of the work for newspaper.  But even in Lightroom, you can go pretty far into the realm of 'edgy magazine feature' with just a few clicks.  Oh the drama.
Lightroom Processing Sports-2572-2

Here are a few more with a basic edit and an over-the-top version based on Matt Kloskowski's "Game Day" Lightroom presets.

This one is with the 70-200mm lens, iso3200, f2.8, 1/1000
Lightroom Processing Sports-3138
Lightroom Processing Sports-3138-2

Lightroom Processing Sports-2920
Lightroom Processing Sports-2920-2

Another boring shot but with nice expression in the eyes.
Lightroom Processing Sports-2665
Lightroom Processing Sports-2665-2

Jun 30, 2012

How to shoot better fireworks photos redux

July 4 2010-3

It is that time of year again to repost about shooting fireworks.  If you still haven't invested in a tripod or  other camera-steadying device, fireworks shows make a great justification to go get one.

Fireworks Tips #1

Fireworks Tips #2

Finally.. for something like the photo above, intentionally focus your camera somewhere close to you.  You should be in manual focus mode anyway if you have a DSLR, so play around with that and zoom in close.

I will be shooting the July 4 event in Terrell for the Tribune... hope to see you there.